Key Points:
-
How the system works
You'll learn the steps our system follows, broken down in simple steps.
-
Creating an account on make.com
We’ll open a new account on the Make platform.
-
Downloading the ready-made Spreadsheet
Download the template that will contain all the article details.
-
Steps to activate the system
Everything you need to start creating unlimited articles.
This document explains the Automated SEO Tool built using Make.com designed to streamline the process of optimizing your blog articles for Search Engines (SEO). It automatically fetches keywords, generates essential metadata and relevant links using AI, and updates your Google Sheet.
Goal: To significantly reduce the manual effort required to prepare articles with SEO-friendly titles, meta descriptions, and relevant internal/external links, allowing you to focus on writing the content itself.
Workflow Overview
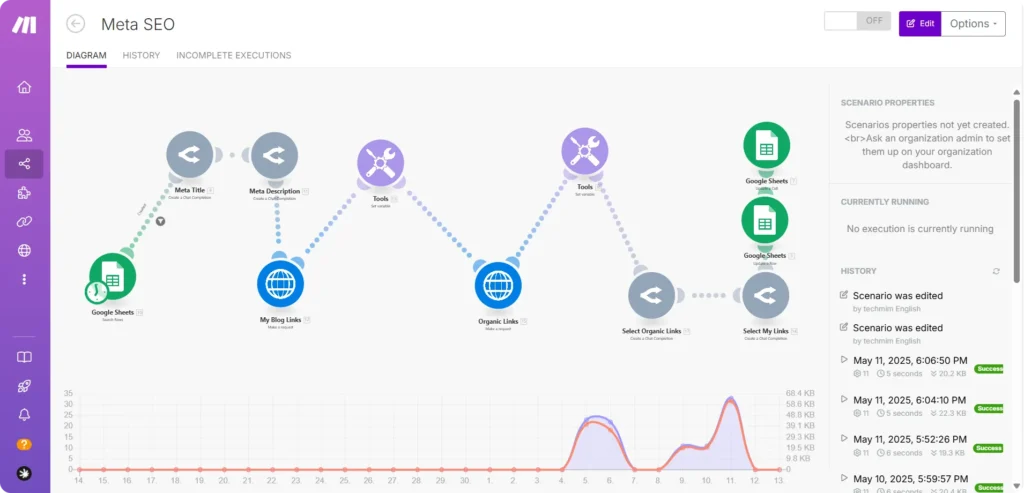
The system is built to automatically prepare professional meta SEO data once you enter a main keyword in the sheet and trigger the tool. It uses AI to generate a catchy title, fetch related internal and external links, intelligently choose the most relevant ones, and update the spreadsheet with all the meta information. Once done, the article is marked as “Ready”—so you can immediately begin writing your fully optimized content.
- Find Pending keyword: Looks for keyword marked as ‘Pending’ in your Google Sheet.
- Generate Title: Creates an SEO-friendly blog title using AI based on the article’s keyword.
- Generate Description: Writes a compelling meta description using AI.
- Fetch Existing Links: Retrieves a list of your current blog article URLs from your website’s sitemap.
- Fetch External Links: Gets top-ranking external websites related to your keyword from Google search results.
- Select Internal Links: Uses AI to choose relevant links from your site to include in the article.
- Select External Links: Uses AI to choose relevant external links from Google search results.
- Update Sheet: Writes all the generated data (Title, Description, Internal Links, External Links) back into your Google Sheet.
- Mark as Ready: Updates the SEO status in the sheet to indicate completion.
How to Open an Account on Make.com
How to Open an Account on Make.com
Opening an account on Make.com is a simple and straightforward process. Just follow these easy steps to get started:
- Visit the Website: First, open your browser and go to the Make.com homepage.
- Click on “Sign Up”: Once you’re on the site, look for the “Sign Up” button at the top of the page and click on it.
- Fill in Your Details: You’ll be prompted to enter your email address and choose a password. Make sure to pick a strong password to keep your account secure.
- Confirm Your Email: After signing up, Make will send a confirmation email to the address you provided. Open the email and click on the confirmation link to verify your account.
- Complete Your Setup: Once you’ve confirmed your email, you can log in with your email and password to complete the setup and start using the platform.
By following these steps, you’ll have your Make.com account ready to use in no time!
How to Upload the Ready-Made Scenario on Make
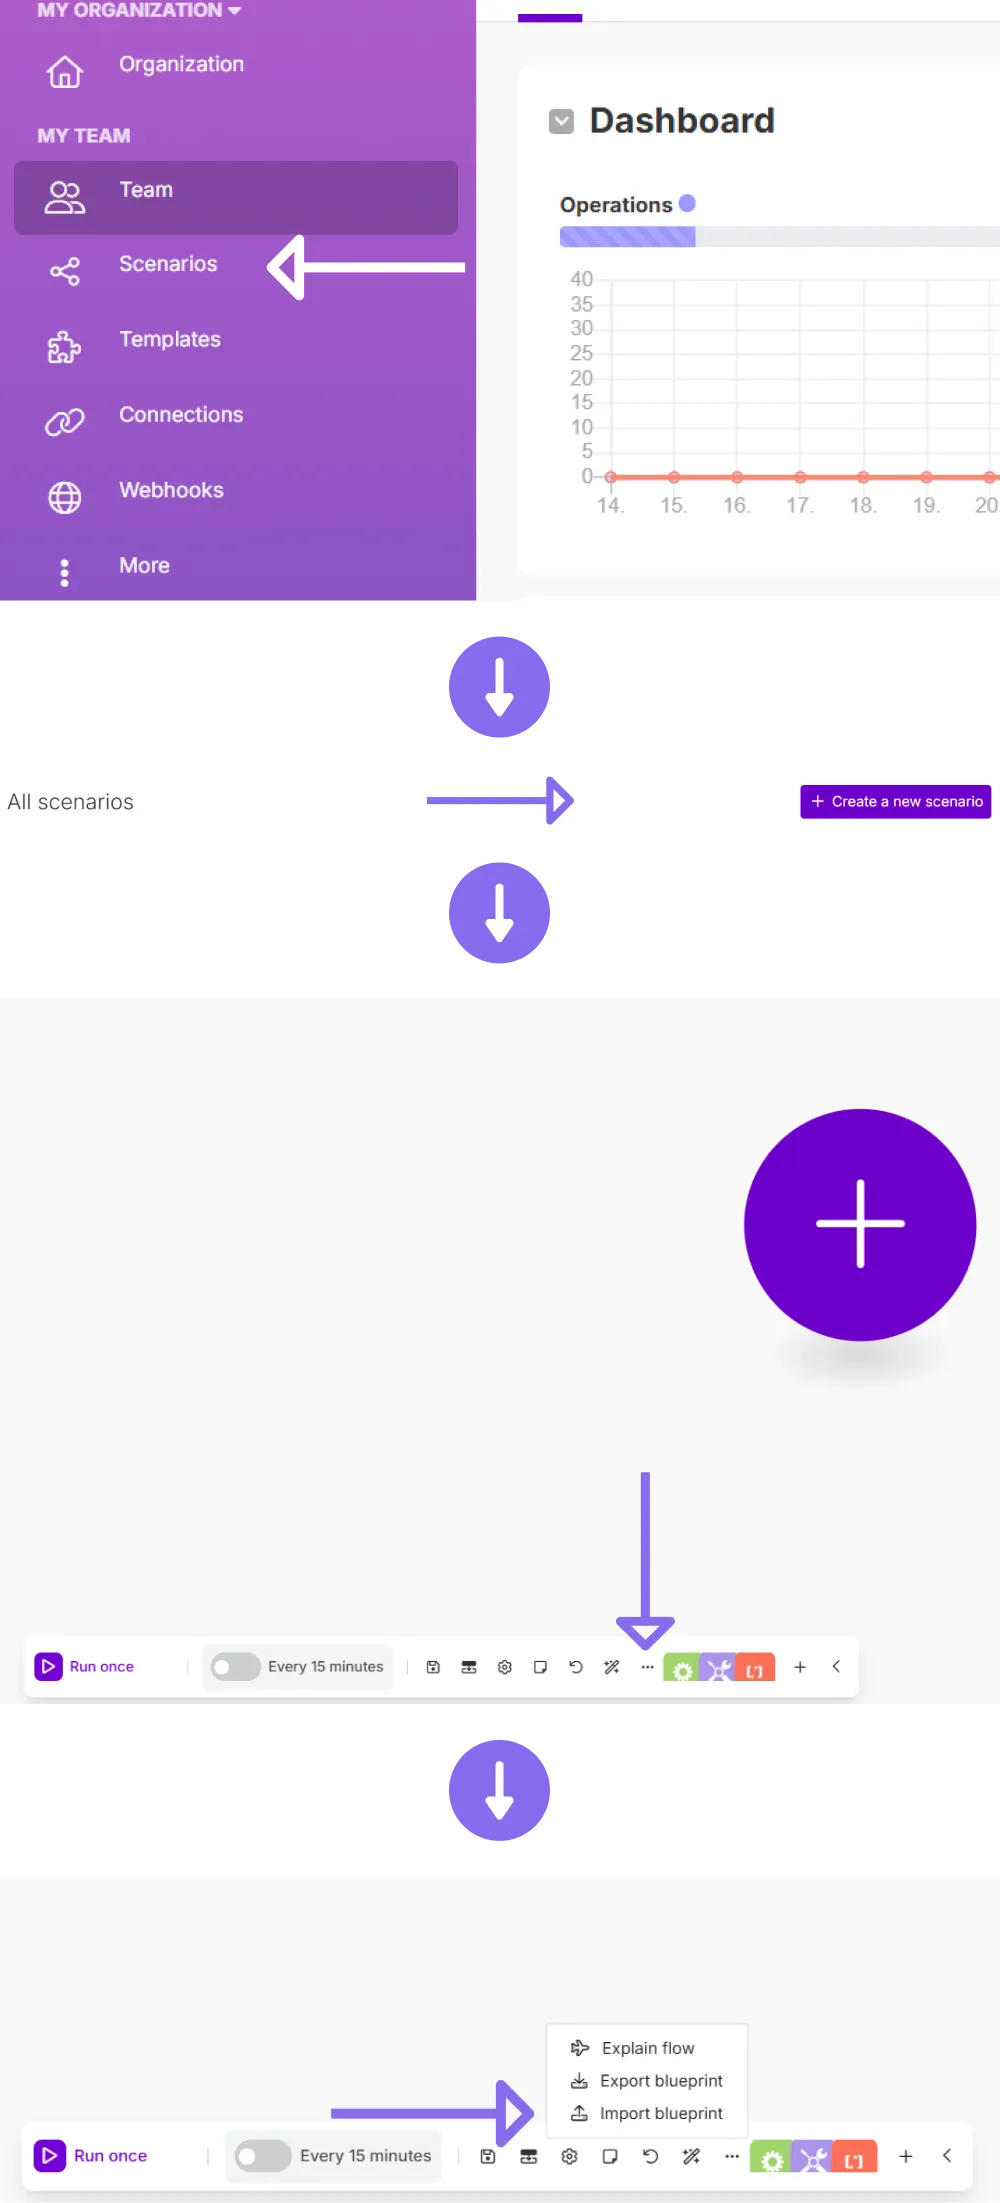
Once you’ve purchased the Automation SEO Tool for just $4 for life, follow these simple steps to upload your downloaded scenario into Make.com:
- Log In to Your Make Account: Head to Make.com and log in with your credentials.
- Go to the Scenarios Section: On the dashboard, click on the “Scenarios” tab to access the scenario management page.
- Upload the Scenario: You’ll see an option to “Import blueprint.” Click on it and choose the scenario file that you downloaded after your purchase.
And that’s it! Now you’re ready to start automating.
Still Not Got the Automated SEO Tool?
If you’re reading this and haven’t bought the Automated SEO Tool yet, here’s your chance to grab it for just $4 for life! Forget about paying over $15/month for other tools—this one-time payment unlocks all the power you need to automate your SEO tasks.
Detailed Steps to Use Automated SEO Tool
Here’s a breakdown of each step (module) in the Make.com scenario:
Retrieve Pending Keyword (Google Sheets: Filter Rows)
- Purpose: Identifies the next article in your Google Sheet that requires SEO optimization.
- Action: Searches a specific sheet (
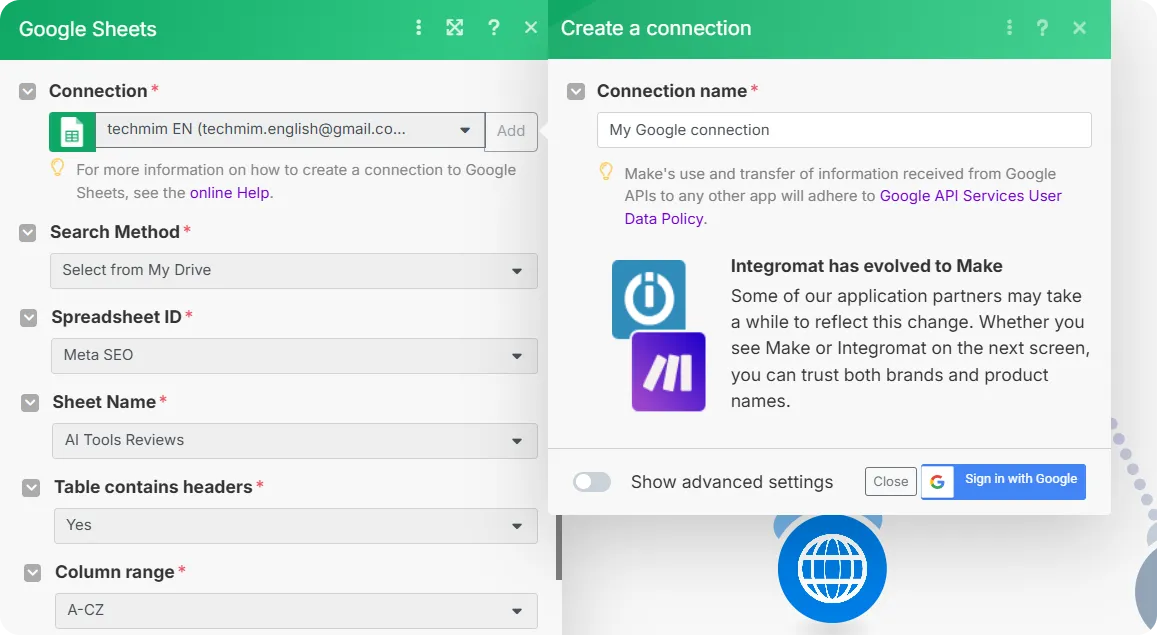
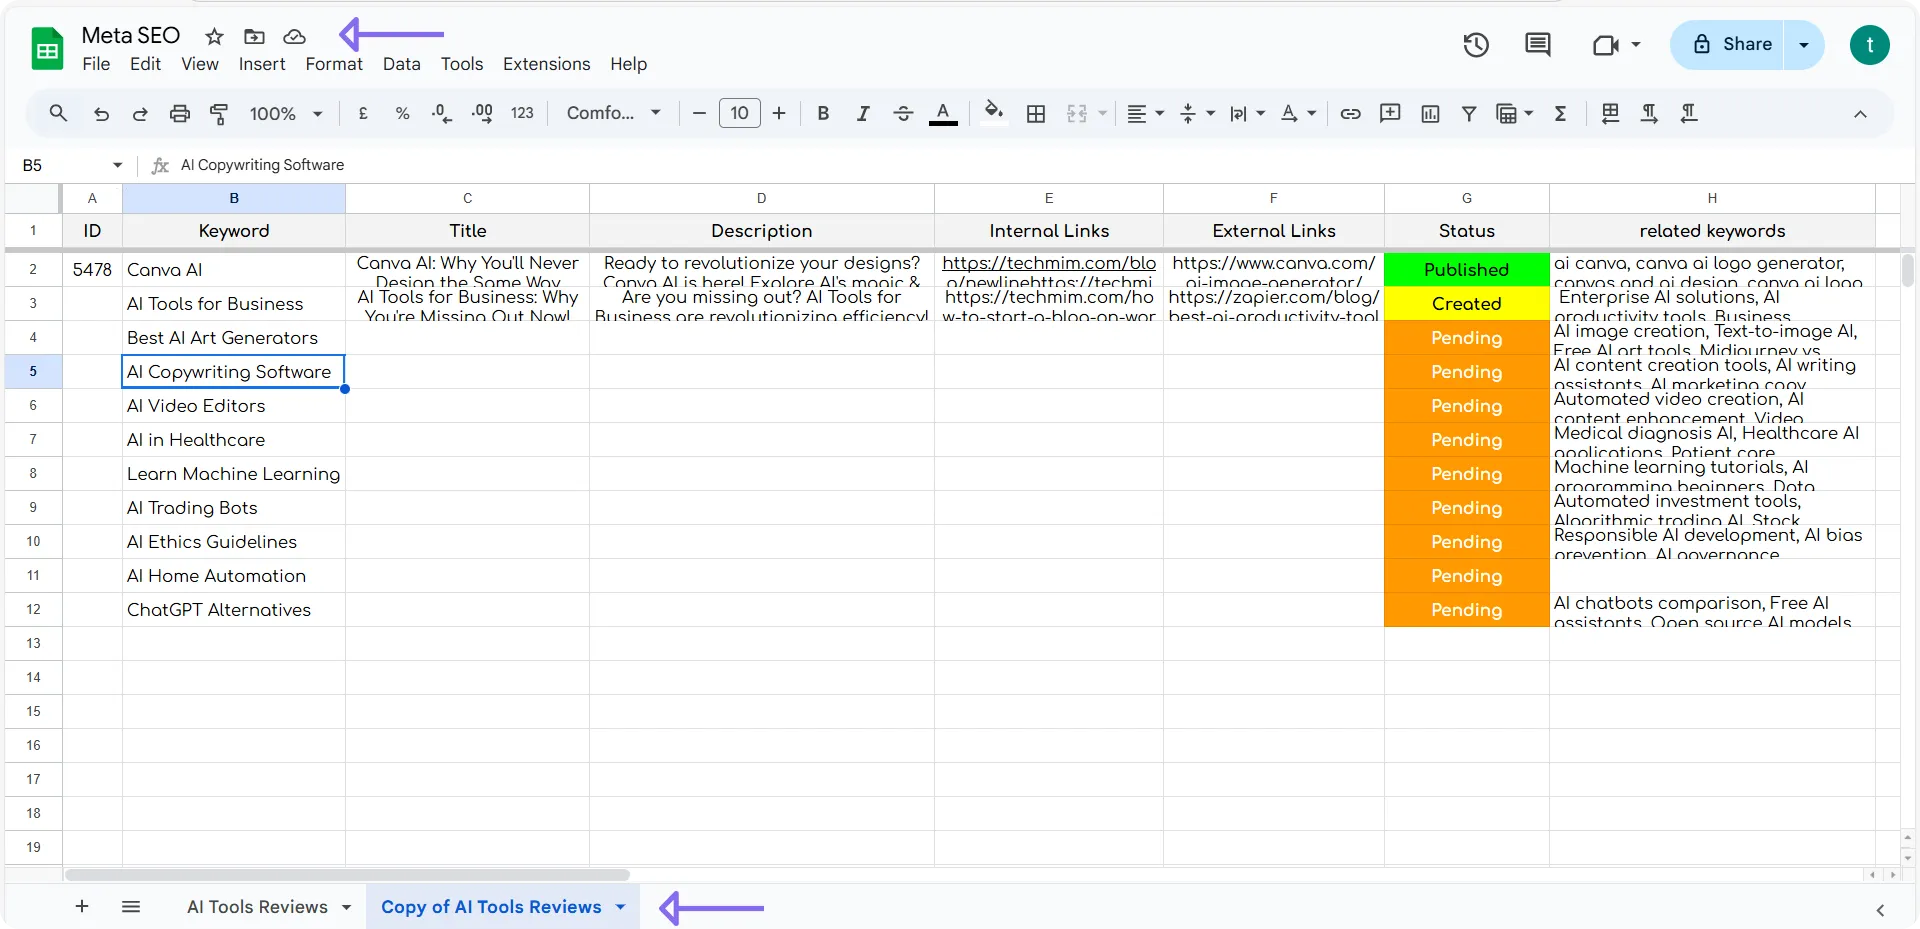
Meta SEO) in a defined spreadsheet (AI Tools Review) for rows where the ‘Status’ column (Column G) is exactly “Pending”. It retrieves only the first matching row to process one article at a time. - After downloading the Google Sheets file I provided and updating it with your own information, make sure to update the corresponding settings in Make to properly connect with Google Sheets.
- Don’t change anything except the Spreadsheet ID—just click on the field and all your available spreadsheets will appear. Then simply choose the one you updated.
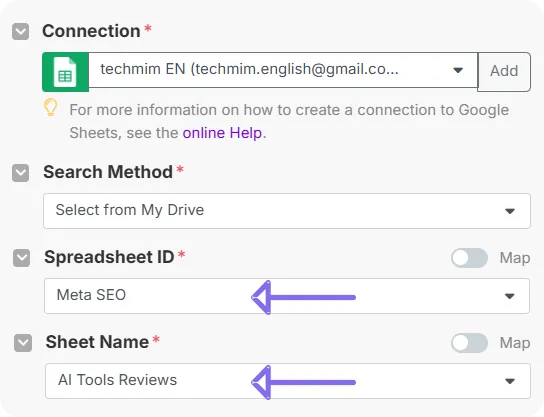
Next, you’ll also need to change the Sheet Name to match the name you gave it. Check the image below for better understanding.

Generate Blog Title (OpenRouter: Create a Chat Completion)
- Purpose: Creates a catchy, SEO-optimized blog post title.
- Action: Sends a prompt to an AI model (configured via OpenRouter, specifically Gemini 2.0). The prompt instructs the AI to generate one blog title based on the Focus Keyword from Step 1, adhering to strict rules like starting with the keyword, being under 65 characters, and using compelling language.
- Output: The generated blog title (plain text).
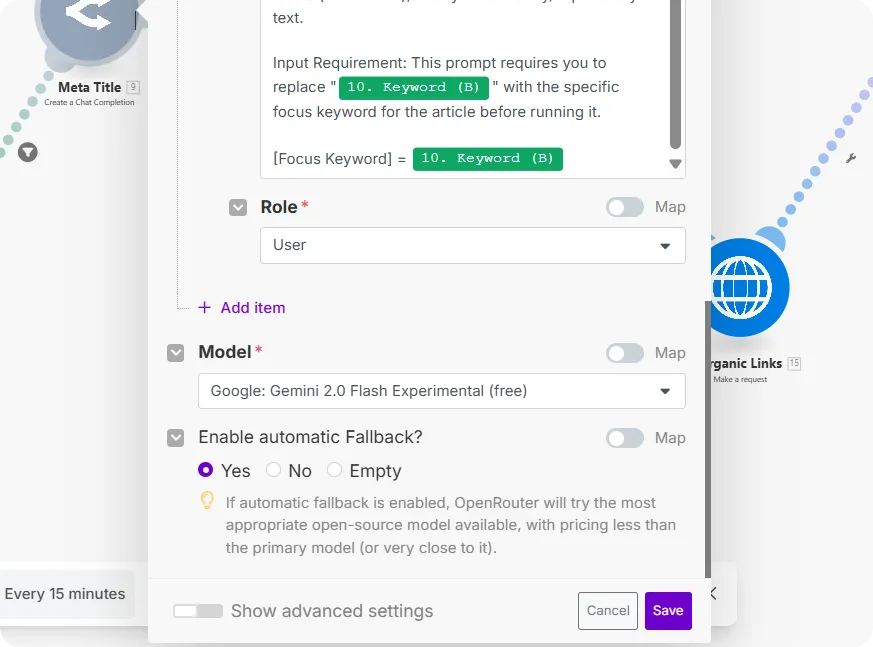
- Now here you can edit the content of the prompt. Pay attention to the green-colored keywords—they are dynamic. You need to click on them, and a sidebar will appear. From there, search for the one named ‘keyword’ and click on it. However, it’s best not to change anything in the prompt, as it has been carefully crafted in a professional way.
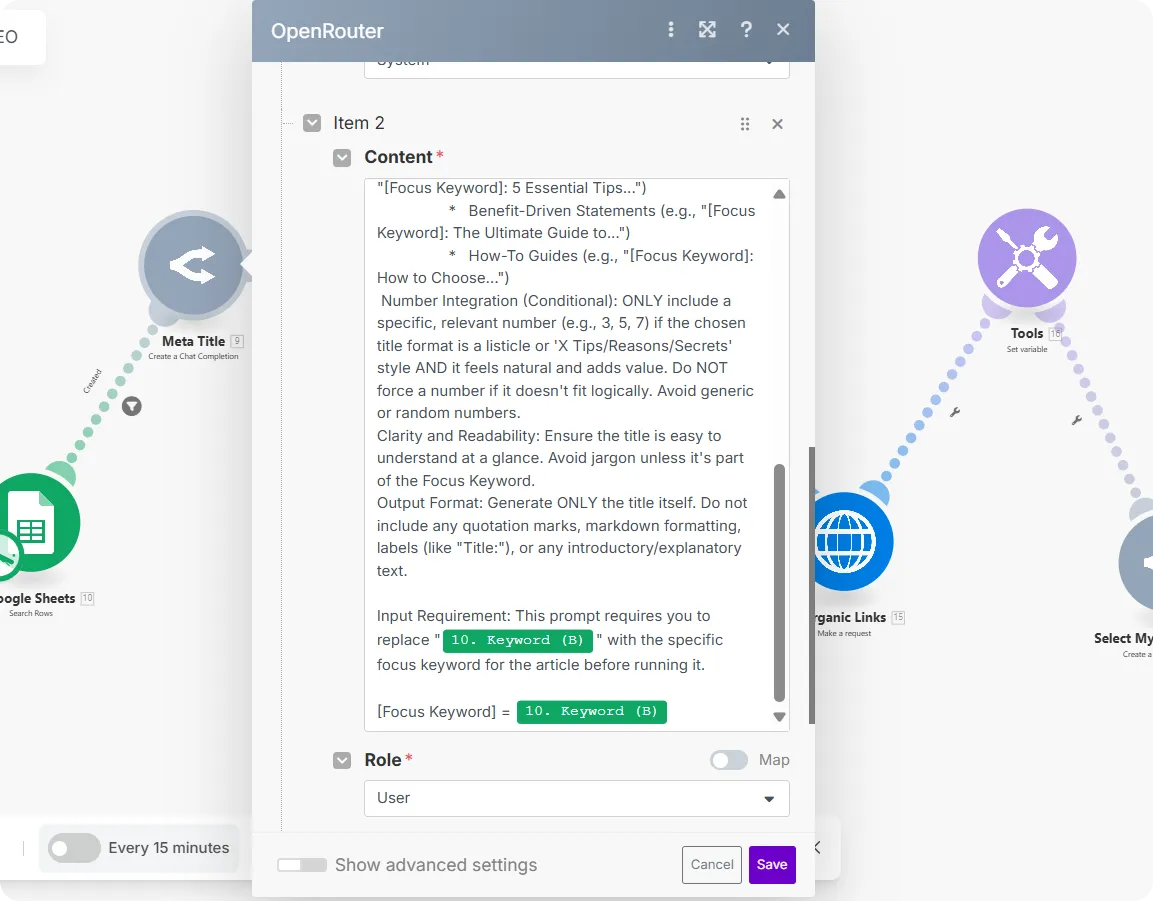
In this section called ‘Model’, click on it and you will see all the AI models. Some are free, while others require purchasing API tokens. You can keep the current model as it is since it is still free and provides good results.
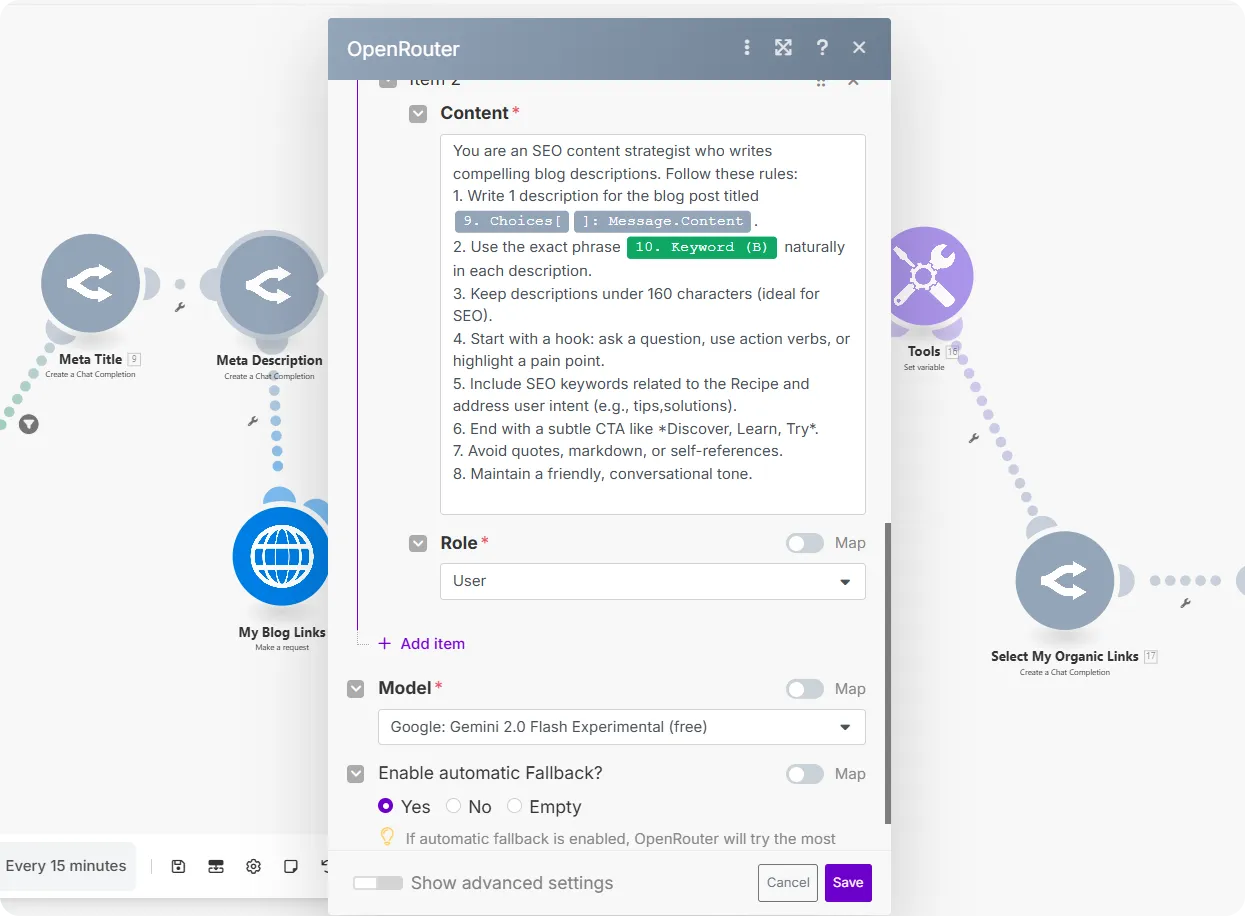
Generate Blog Meta Description (OpenRouter: Create a Chat Completion)
- Purpose: Writes an engaging and SEO-friendly meta description.
- Action: Sends another prompt to an AI model (configured via OpenRouter, likely Gemini again, based on the blueprint). This prompt requests a meta description based on the article’s keyword (from Step 1) and the title (from Step 2), with rules for character count (under 160), keyword inclusion, and tone.
- Output: The generated meta description (plain text).
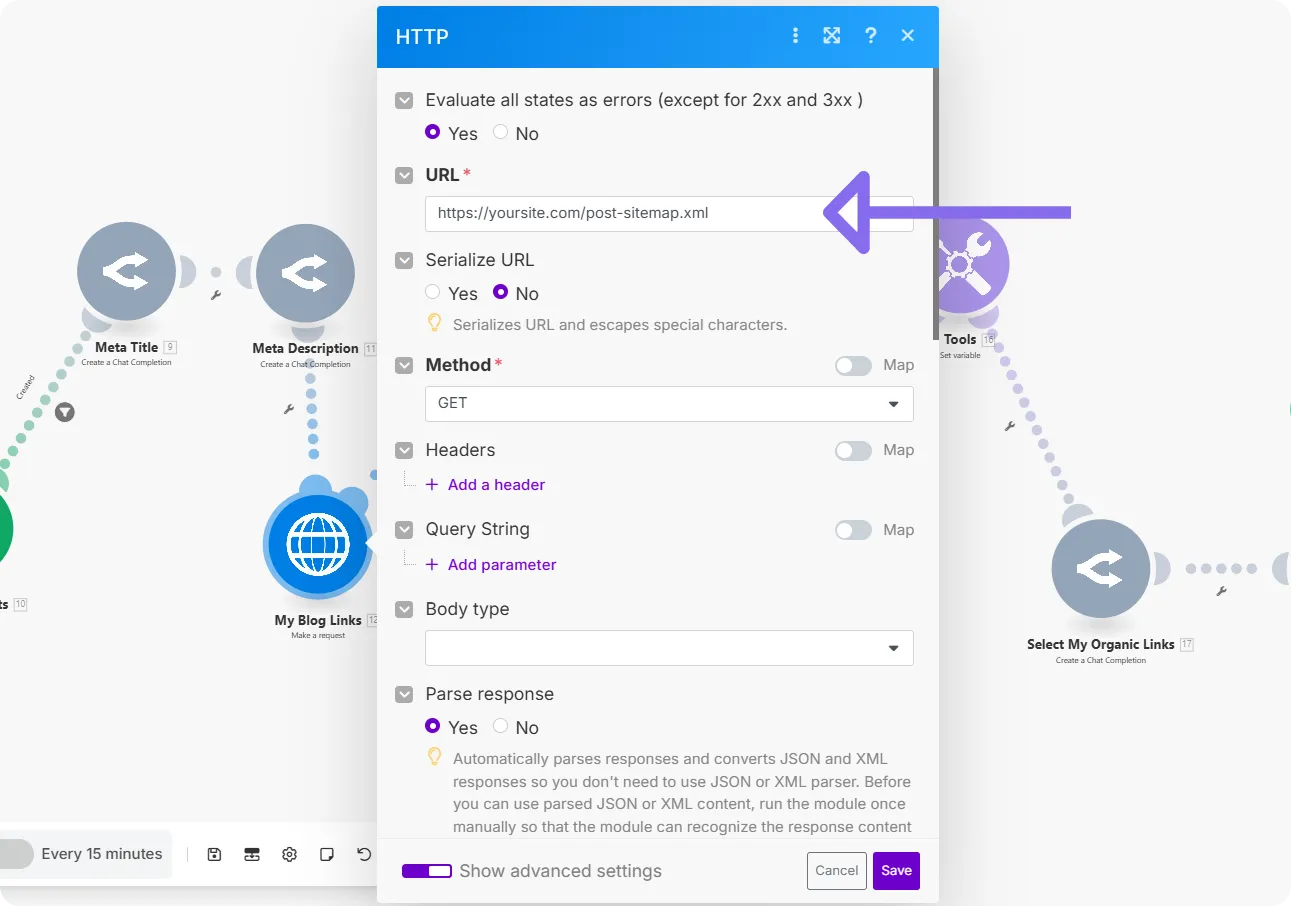
Fetch Your Website Links (HTTP: ActionSendData)
- Purpose: Get a list of existing blog post URLs from your own website’s sitemap.
- Action: Performs an HTTP GET request to a specified URL (
https://yoursite.com/post-sitemap.xml). This URL is assumed to be your blog’s XML sitemap, which lists all your post links. - Output: The raw XML content of your sitemap.
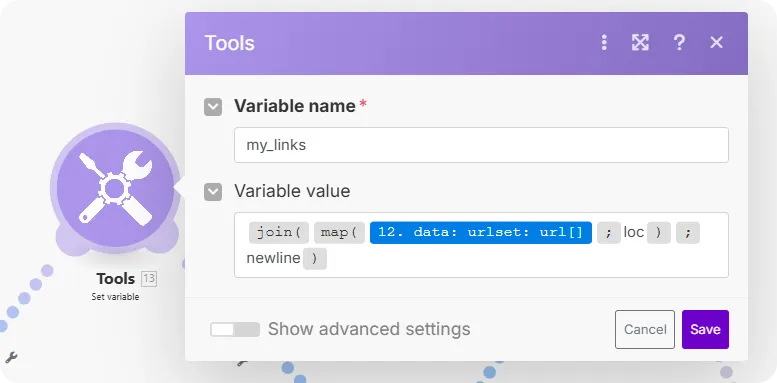
Store Internal Links Variable (Utility: Set Variable)
- Purpose: Makes the list of your blog’s URLs easily accessible for later steps.
- Action: Processes the XML output from Step 4, extracts all the
<loc>tags (which contain the URLs), joins them into a single list separated by newlines, and stores this list in a variable namedmy_linksfor the current automation cycle. - Output: The
my_linksvariable containing a list of your internal blog URLs.
Get Top Google Results (HTTP: ActionSendData)
- Purpose: Finds out what external sites are ranking for your target keyword.
- Action: Performs an HTTP POST request to the Serper.dev API (
https://google.serper.dev/search). It sends the Focus Keyword from Step 1 in a JSON payload, requesting top organic search results for the US (gl: "us") and English language (hl: "en"). - Authentication: Uses an API Key in the request headers (
X-API-KEY). - Output: A JSON object containing search results data, including a list of top organic links.
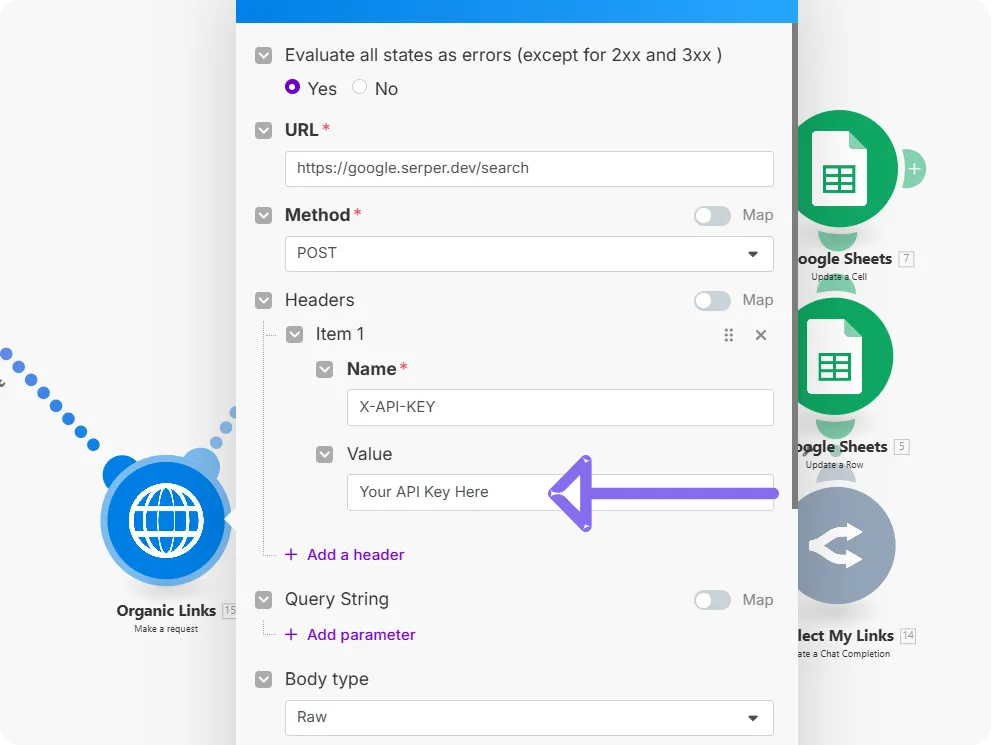
Where can I find my API Key? Click here to find out how.
Store SERP URLs for Analysis (Utility: Set Variable)
- Purpose: Makes the list of top Google result URLs easily accessible for later steps.
- Action: Processes the JSON output from Serper.dev (Step 6), extracts the
linkfield from each organic result, joins them into a single list separated by newlines, and stores this list in a variable namedgoogle_urlsfor the current automation cycle. - Output: The
google_urlsvariable containing a list of external URLs ranking on Google for the keyword.
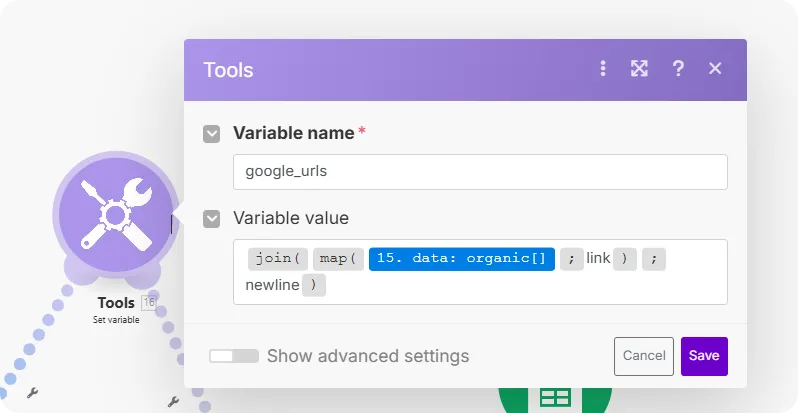
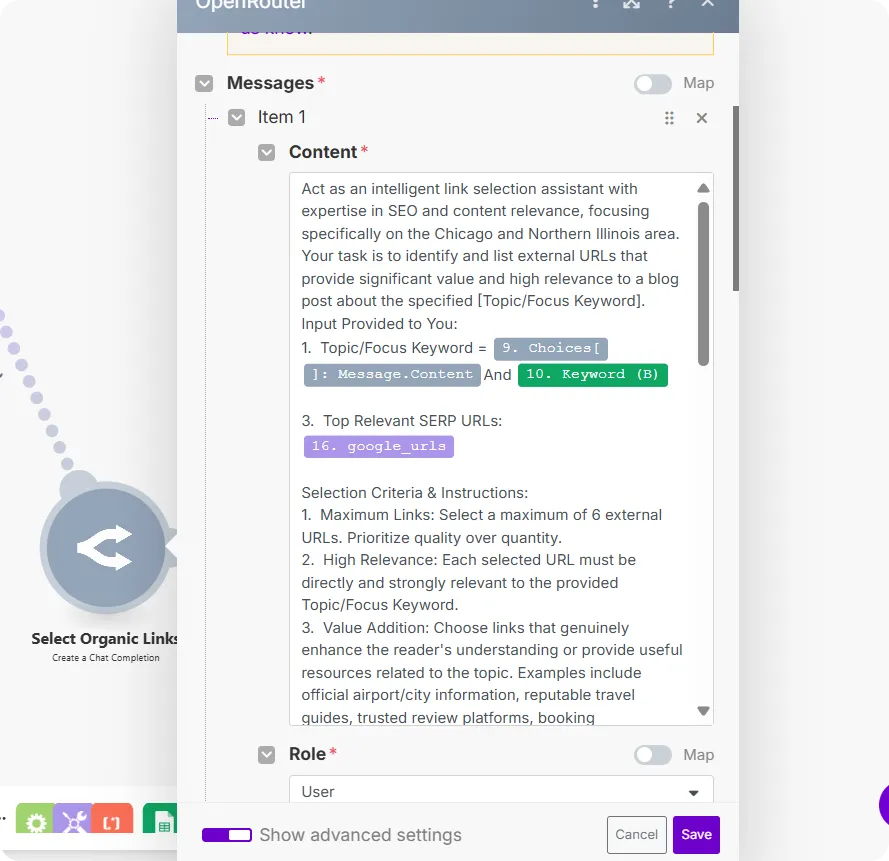
AI Selects Relevant External Links (OpenRouter: Create a Chat Completion)
- Purpose: Chooses the most relevant and valuable external links from the Google search results to potentially include in your article.
- Action: Sends a prompt to an AI model (configured via OpenRouter, specifically Gemini Flash, based on the blueprint). The prompt provides the Focus Keyword/Title (from Step 1 & 2) and the list of
google_urls(from Step 7). It instructs the AI to select up to 6 highly relevant, non-competitive external links that add value to the article. - Output: A list of selected external URLs (plain text, one per line).
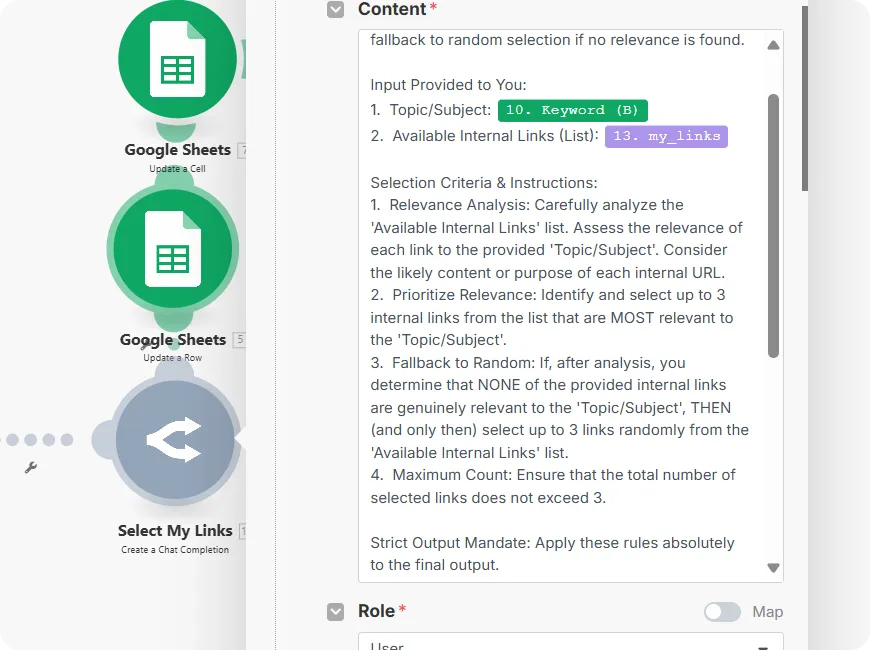
AI Selects Relevant Internal Links (OpenRouter: Create a Chat Completion)
- Purpose: Chooses the most relevant existing articles on your site to link to from the new article.
- Action: Sends a prompt to an AI model (configured via OpenRouter, specifically Gemini Flash). The prompt provides the Topic/Subject (Focus Keyword from Step 1) and the list of your internal blog URLs (
my_linksfrom Step 5). It asks the AI to select up to 3 internal links that are most relevant to the topic, with a fallback to selecting random links if no clear relevant ones are found. - Output: A list of selected internal URLs (plain text, one per line).
Update Google Sheet with Generated Data (Google Sheets: Update Row)
- Purpose: Writes the generated SEO data back into the original row in your sheet.
- Action: Uses the row number identified in Step 1 to update specific columns in the Google Sheet. It maps the generated Title (from Step 2) to Column C, the Description (from Step 3) to Column D, the selected Internal Links (from Step 9) to Column E, and the selected External Links (from Step 8) to Column F.
- Output: Updates the specified row in the Google Sheet.
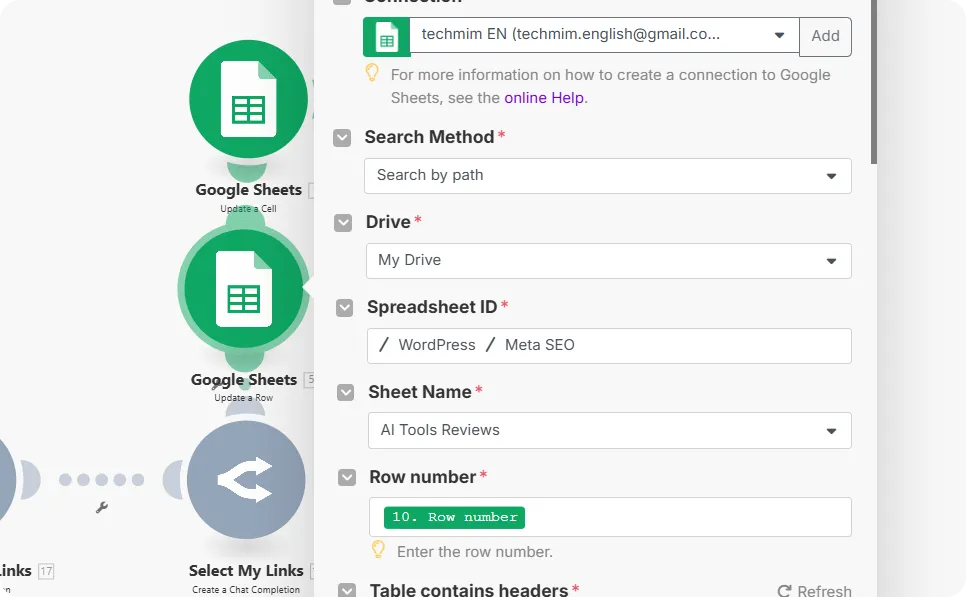
Mark Article Status as ‘Ready’ (Google Sheets: Update Cell)
- Purpose: Signals that the automation for this specific article is complete.
- Action: Uses the row number from Step 1 to update the ‘Status’ cell (Column G) for that row, changing its value from “Pending” to “Created” (or “Ready”).
- Output: Updates the status cell in the Google Sheet.
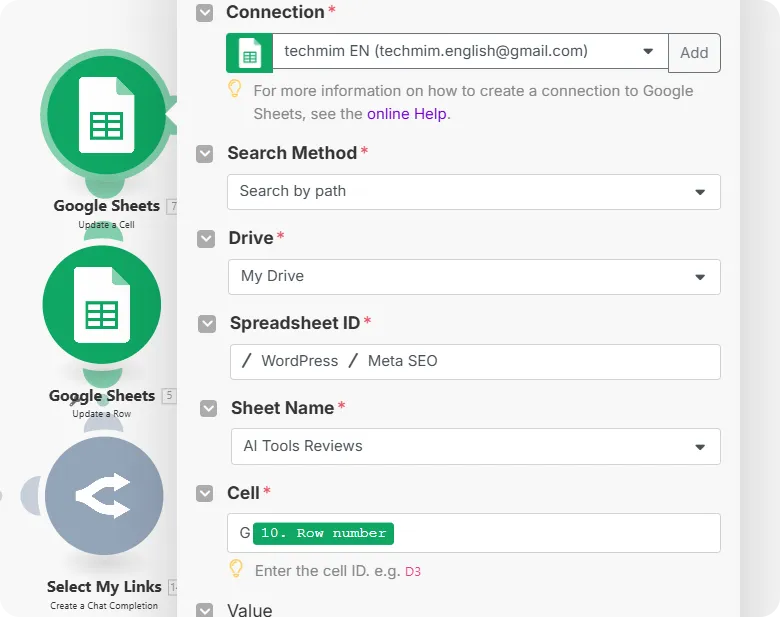
Make sure you have updated the Spreadsheet ID field and the Sheet Name field as well, so you are on the right track
Setting Up the System: Key Components & Connections
To make this system work, you need accounts and API keys for the external services and connections configured in Make.com.
OpenRouter AI: Used for AI content generation and link selection.
- Role: Provides access to powerful AI models.
Setup:
Sign up for a free account: https://openrouter.ai/
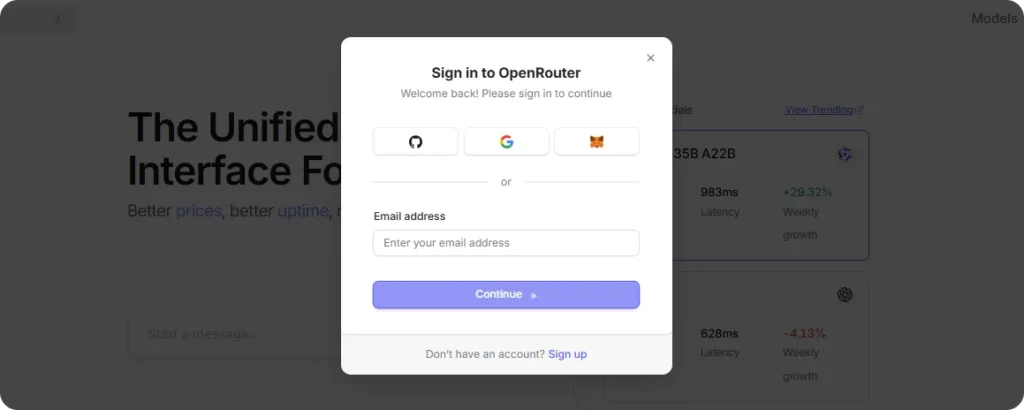
Get your API Key: Go to “Your API Keys” and create a new key. Copy it.

Serper.dev: Used to fetch real-time Google search results.
- Role: Provides structured data of Google SERP for a given keyword.
Setup:
Sign up for an account: https://serper.dev/ (May require a paid plan after use 2500 search).
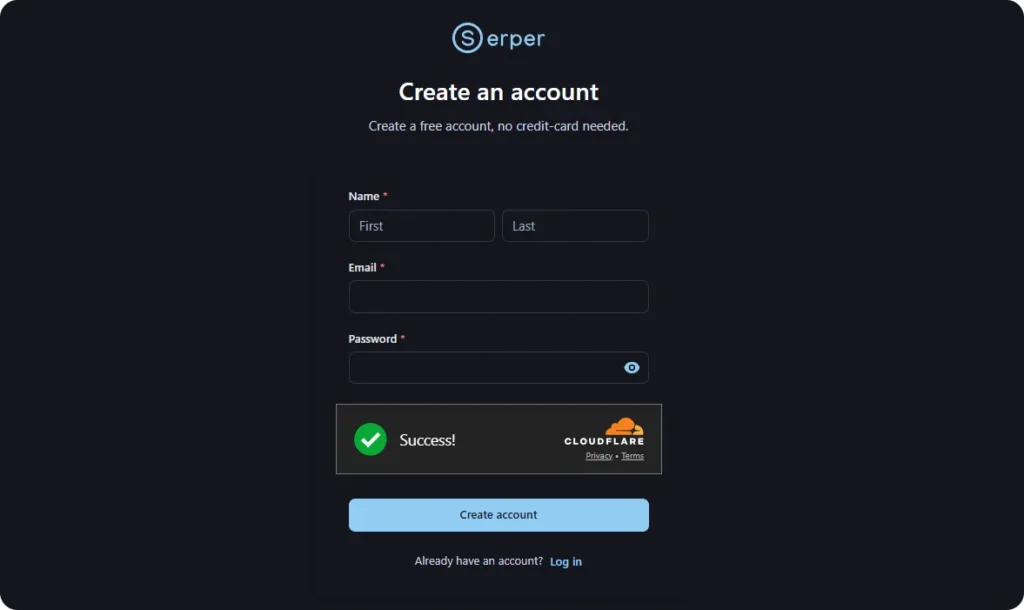
Generate API Key: Find your API key in your dashboard.
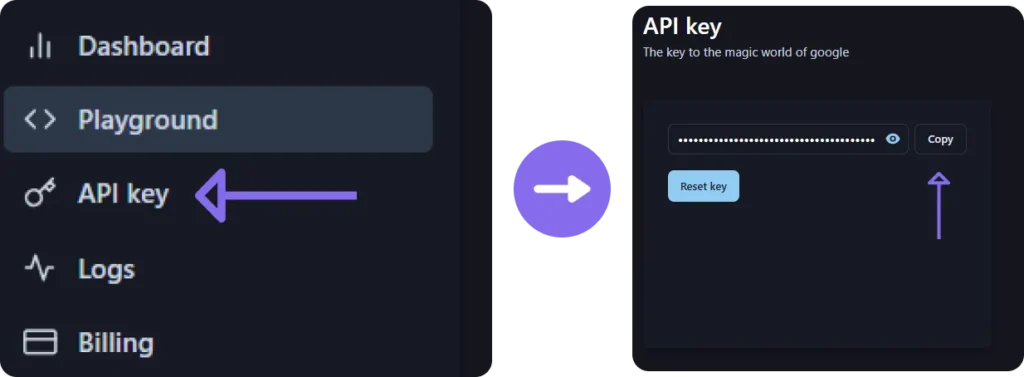
Connect in Make: Use the HTTP module. The URL is https://google.serper.dev/search. Use the POST method. Add an X-API-KEY header with your key. Send the keyword in the request body as JSON.
Your Website’s Sitemap: Used to fetch your existing blog URLs.
- Role: Provides a list of URLs on your site for internal linking.
Setup:
Identify your sitemap URL (e.g., https://yourdomain.com/sitemap.xml). If you use a CMS like WordPress with Yoast or Rank Math, it’s usually /sitemap_index.xml or /post-sitemap.xml. Select the sitemap that points to your blog posts — it doesn’t matter which plugin you’re using.
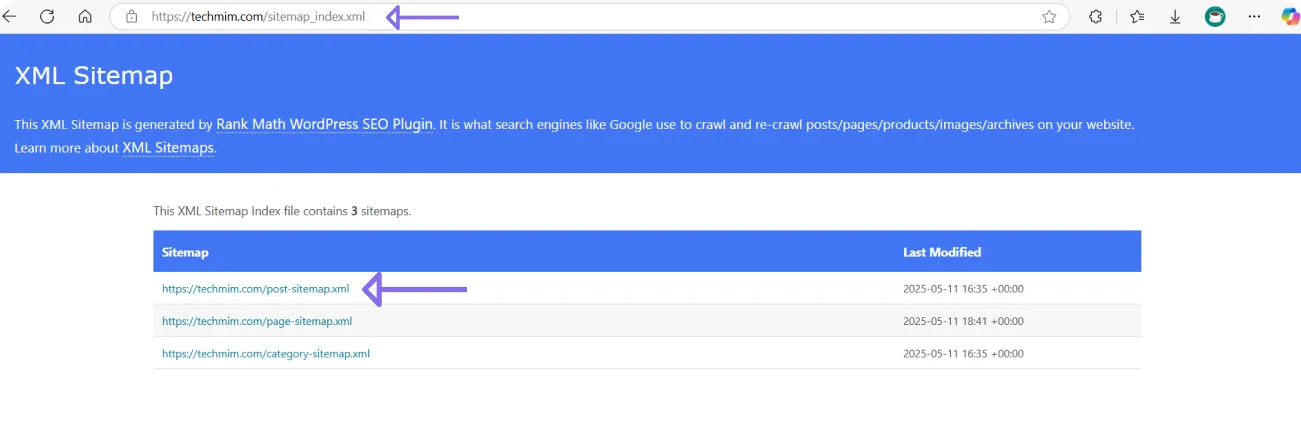
Connect in Make: Use the HTTP module (GET method) pointed at your sitemap URL. Follow this with Make’s built-in XML module to parse the data and a Set Variable module to store the extracted links.
Understanding Sitemaps (Yoast link for context)
Make.com Guide on Working with XML (Search their docs for the XML module details)
Google Sheets: Used as the central database for articles and their status.
- Role: Stores keywords, receives generated data, and tracks optimization status.
Setup:
Connect Google Sheets to your Make.com account: Go to “Connections” in Make and add a Google Sheets connection, granting necessary permissions.
Ensure your sheet has columns for ID, Keyword, Title, Description, Internal Links, External Links, and Status, configured as expected by the modules. If you haven’t downloaded the ready-made sheet provided with the Automated SEO Tool, “Click Here” to download it now.
Connecting Google Sheets to Make.com
Best Practices for Usage
- Test Modules Individually: Before running the full scenario, test each HTTP and AI module with sample data to ensure connections and prompts are working correctly.
- Secure API Keys: Treat your API keys like passwords. Never share them publicly. Make.com’s connection handling keeps them secure within your account.
- Utilize Variables: The use of
Set Variablemodules is crucial for efficiently passing data (like the lists of links) between different steps. - Test with One Row: When first setting up or modifying the scenario, limit the Google Sheets filter to process only 1 row. This saves operations and allows you to verify the output for a single article before processing many.
Conclusion
This Automated SEO Tool is a powerful tool for content creators and SEOs. By automating the generation of key SEO metadata and the selection of relevant links, it dramatically accelerates the article preparation phase, allowing you to scale your content production more efficiently. It integrates seamlessly with your existing Google Sheets workflow and leverages the power of AI and web data.


